Most people reading a case study about shower cabins are not browsing for inspiration. They have a bathroom, a rough budget and a shortlist of suppliers, and they want to know one thing:
what will actually happen if I hire this company? Photos of finished bathrooms answer only half of that. The other half is what happens before and after the photo: how the measurements are taken, what the quote contains, how glass reaches a high-rise apartment, and what goes wrong and who fixes it.
This case study walks through a real-style job from start to finish a
frameless shower glass cabin installed in a Clifton apartment in Karachi. We cover the brief, the options we compared, the specification, the full cost breakdown, the timeline, the problems that came up and the result after several months of daily use. If you are close to ordering, use it as a benchmark for your own quote.
Project Snapshot
| Item |
Detail |
| Location |
Clifton, Karachi (apartment, upper floor, lift access) |
| Space |
Master bathroom, shower corner approx. 1,200 mm × 900 mm |
| Product |
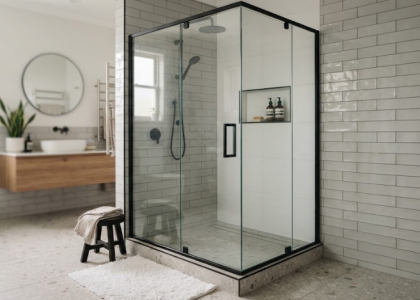
Frameless corner shower cabin, one fixed panel and one hinged door |
| Glass |
10 mm clear tempered safety glass with anti-stain coating |
| Hardware |
Stainless steel hinges, clamps, handle and waterproof seals |
| Pricing |
Single itemised written quote covering supply, fabrication, delivery and installation |
| Time from site visit to handover |
Approximately 2 weeks |
| Warranty |
2 years on glass panels and hardware |
The Brief
The apartment belonged to a young family who had recently bought it. The master bathroom was in decent condition, with tiles they liked and a sanitary fitting set they had no plans to change. What they hated was the shower curtain. It stuck to legs, grew mould at the hem within months, and let water run across the floor towards the door. A previous attempt at a framed aluminium-and-acrylic screen had yellowed and been removed by the earlier owner, leaving drill holes in the tile.
Their brief was short and clear:
- Keep water inside the shower area, with no pooling on the bathroom floor.
- A clean, light look that makes a small bathroom feel larger.
- Safe for a household with young children.
- Easy to clean in Karachi’s humid, salty-air conditions.
- A fixed budget, with written pricing before any work started.
The last point mattered most. They had already received two verbal quotes that differed widely, with no explanation of why. They were not looking for the cheapest option. They wanted an itemised price they could trust.
How the Client Chose a Supplier
Before contacting us, the client compared three suppliers using a simple scorecard. It is worth borrowing, because it covers the things that cause regret later.
- Is the glass tempered, and what thickness? Thin or untoughened glass was an immediate no.
- Is a site visit included? A quote built on the client’s own measurements was treated as a risk.
- Is the price itemised? Glass, hardware, delivery and installation as separate lines.
- Is installation done by the supplier’s own team? Handing off to a third-party fitter splits responsibility.
- Is the warranty in writing? And does it cover hardware, not just glass?
- Can they show similar completed work? They checked our project references before calling.
Green Glass Designer scored well because the process was explained upfront: site visit and consultation, customised design, fabrication, delivery, installation and after-sales service, with a 2-year warranty on glass panels and hardware. The client booked a free consultation through WhatsApp the same day.
Worth Noting A supplier who refuses to visit the site before quoting is guessing. Walls in apartments are almost never perfectly straight, and glass cannot be trimmed on site.
The Site Visit
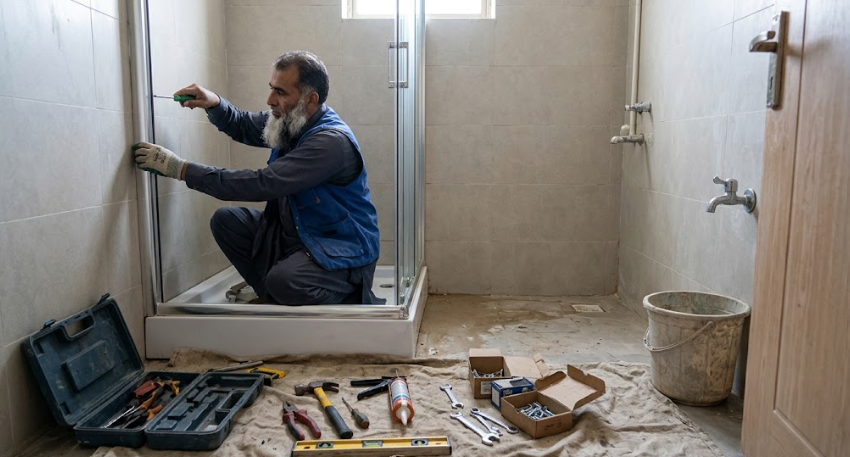
Our team visited the apartment within two days of the enquiry. The visit took about 45 minutes and covered more than a tape measure. Here is what we checked and why it matters, especially in a Clifton apartment.
1. Wall and floor condition
We measured the shower corner at the top, middle and bottom of both walls. The two walls were out of plumb by about 6 mm over the height of the glass. That is normal in an apartment, but frameless glass needs to be made to the real dimensions, not the nominal ones. We also checked the shower floor slope. It fell towards the drain correctly, but the tray edge was slightly uneven, which affected the door’s bottom seal height.
2. Tile layout and fixing points
Frameless cabins are fixed through hinges and clamps into the wall. We located the grout lines and checked tile thickness so that drilling would land on a solid part of the tile rather than a corner. The old drill holes from the previous screen were noted, and we planned the new fixing points to avoid them, or to cover them with the hinge plates.
3. Humidity and coastal air
Clifton sits close to the sea, and salt-laden air is hard on cheap metal. This pushed us to specify stainless steel hinges and fittings instead of plated alternatives, and to recommend an anti-stain coating on the glass. Salt and hard water leave marks quickly, and a coated surface is much easier to wipe clean.
4. Door swing and access
The family wanted the door to open outward. We checked clearance from the vanity and toilet, and confirmed a 90-degree swing would not strike anything. We also noted that a sliding door was possible, but the narrow shower width meant the opening would be limited.
5. Building logistics
Apartment buildings often have rules about delivery times, lift use and noise. We asked the building management about permitted working hours and whether the lift could carry a crated panel. The longest panel would be about 2 metres tall, so we measured the lift’s internal height and door opening on the spot. It fitted, but only just.
Design Options Compared
We presented three options, each with a written price, so the client could compare like with like.
| Option |
Description |
Pros |
Cons |
| A. Framed sliding cabin |
Aluminium frame, sliding door on rollers |
Lowest cost, good for tight door clearance |
Frame traps soap scum, looks heavier, more seals to clean |
| B. Frameless corner cabin |
Fixed panel plus hinged door, 10 mm glass, minimal hardware |
Clean look, easy to wipe, feels spacious |
Needs accurate measurements, door needs swing space |
| C. Full-height custom cabin |
Floor-to-ceiling glass, custom hardware |
Most dramatic finish |
Highest cost, heavier handling in a lift, more installation risk |
The client chose Option B. The reasoning is useful: Option A saved money but contradicted the “easy to clean” goal. Option C added cost and logistics for a small bathroom without much practical gain. Option B delivered the look and the cleaning benefit within budget.
Our broader range includes
sliding glass cabins, corner enclosures and hinged designs, so the right answer depends on your layout. For this bathroom, the hinged frameless design was the best fit.
Final Specification
A quote without a specification is a promise without a definition. This is what was written into the agreed order:
- Glass: 10 mm clear tempered safety glass, within the 8 mm to 12 mm range we use for shower cabins. Tempered glass is roughly 4 to 5 times stronger than standard glass, and if it breaks it fragments into small blunt pieces instead of sharp shards.
- Coating: anti-stain treatment on the shower-facing surface.
- Hardware: stainless steel hinges, wall clamps and a matching handle, chosen for resistance to humidity and salt.
- Seals: waterproof door seal and a drip strip along the base of the door.
- Finish: brushed stainless to match the existing fittings.
- Edges: polished, with safe rounded corners.
- Sealant: mould-resistant silicone at the wall and floor joints.
- Warranty: 2 years on glass and hardware, handed over in writing.
Worth Noting Toughening happens after the glass is cut and drilled. Any hole, notch or size change must be final before fabrication, because tempered glass cannot be modified afterwards.
Cost Breakdown
Shower cabin pricing depends on size, glass thickness, hardware and door type. This job sat in the upper-middle of our range because of the thicker glass, coating and stainless hardware. Here is how the quote was structured, with each line shown separately so the client could see exactly what they were paying for.
| Line item |
Share of total |
What it covers |
| Glass supply |
Largest item |
10 mm clear tempered glass, polished edges, anti-stain coating |
| Hardware |
Second largest |
Stainless steel hinges, clamps, handle, seals, drip strip |
| Fabrication |
Moderate |
Precision cutting, drilling, notching and toughening |
| Delivery |
Small |
Protective crating and transport to the apartment building |
| Installation |
Moderate |
Fixing, levelling, silicone sealing, testing and cleanup |
| Total |
One fixed, written price |
Site visit and consultation included at no charge |
Where the money goes, and where it should not be cut
About half the price sits in the glass. Hardware is the next largest item, and it is the one buyers are most tempted to downgrade. Do not. Hinges carry the full weight of the door and take the daily stress. A cheap hinge can sag within a year, which leaves the door rubbing against the glass and failing to seal. In a salty coastal environment, plated hardware also starts to rust at the edges, which is both ugly and a sign of future failure.
Installation is the other line not to compress. Frameless glass relies on correct levelling and the right fixings, and an error here is hard to correct later. The client paid a little more for supplier-managed installation and gained a single point of responsibility. If something is off, there is nobody else to blame.
What would have changed the price
- Size: a larger shower footprint adds glass and hardware cost.
- Thickness: moving from 8 mm to 12 mm raises glass cost, and heavier panels need stronger fixings.
- Glass type: frosted, tinted or patterned glass costs more than clear.
- Door type: sliding mechanisms add rollers and track hardware.
- Height: floor-to-ceiling panels increase both glass cost and handling complexity.
Timeline
| Stage |
Duration |
What happened |
| Enquiry and site visit |
Day 1 to 3 |
WhatsApp enquiry, visit, measurements and photographs |
| Design and quote approval |
Day 3 to 5 |
Three options priced, client chose Option B, specification signed off |
| Fabrication and toughening |
Day 5 to 11 |
Glass cut, drilled, polished, toughened and coated |
| Inspection and packing |
Day 11 to 12 |
Quality check and protective crating |
| Delivery and installation |
Day 13 |
Lift delivery, fixing, sealing and testing |
| Silicone cure and handover |
Day 14 |
Final inspection, warranty and care guidance |
The longest stage is fabrication, because toughening cannot be rushed. The best way to protect your timeline is to approve the specification quickly and avoid changing the size or hole positions after fabrication starts.
Fabrication and Delivery
Once the specification was confirmed, the glass was cut to the measured dimensions, allowing for the 6 mm wall variation. Holes for hinges and the handle were drilled before toughening, and the edges were polished. After toughening, each panel was inspected for flatness, chips, scratches and edge quality, and the anti-stain coating was applied.
Panels were packed upright with edge protectors and foam between sheets, in a crate designed for lift transport. A crated piece of glass that is poorly packed is the most common cause of damage in transit, which is why we treat packing as part of fabrication, not an afterthought.
Delivery was scheduled with the building management for a weekday morning when the lift was quiet. Two team members carried the crate, with a third guiding the lift. The panels arrived with zero damage.
Installation Day
Installation took roughly four hours. The sequence was as follows:
- Protect the space. The floor and vanity were covered and the shower tray was cleaned and dried.
- Mark and check. Fixing points were marked with a level and re-checked against the tile grid.
- Drill and fix. Wall anchors and hinge plates were fitted with care to avoid cracking tile.
- Lift the fixed panel. Placed into the base channel and clamps, then levelled and locked.
- Hang the door. Hinges attached, door aligned and adjusted until the gaps were even.
- Seal. Mould-resistant silicone applied at the wall and floor joints, with the drip strip and seal fitted to the door.
- Test. Door swing, closing, seal contact and a water test with the shower running.
- Clean and handover. Glass wiped, debris removed and the client walked through the finished work.
The silicone needed around 24 hours to cure, so we asked the family not to use the shower until the next day. This is standard practice. Using it too early can cause leaks and weaken the seal.
Problems We Solved
No installation is perfectly smooth, and a case study that claims otherwise is not telling the whole story. Three issues came up.
The out-of-plumb wall
The 6 mm variation was caught at the site visit and built into the glass dimensions. Without that, the door would have rubbed on one side and left a visible gap on the other. This is the clearest argument for supplier-led measurement.
A tight lift
The crate cleared the lift ceiling by less than 30 mm. We had planned for this by measuring in advance, but on the day we still tilted the crate slightly to ease it through the door. A supplier who has never visited would likely have found this out at the building entrance, with the glass already in transit.
A hinge position slightly off the tile line
One hinge position fell close to a grout line, and the first drill test suggested the tile edge might chip. We shifted the fixing point by a few millimetres, within the hinge plate’s adjustment range, and the result was clean. The lesson: experienced installers carry spare options and adjust on the spot rather than forcing a bad drill.
The Result
The client contacted us about six months later for a routine check, and the results were consistent with what the brief asked for.
- Water control: the floor outside the shower stays dry, and the drip strip and seals do the job.
- Cleaning: a soft cloth and glass cleaner after each shower is enough. Limescale spots wipe off easily because of the anti-stain coating.
- Space: the bathroom looks larger, because clear glass removes the visual barrier the curtain created.
- Hardware: no rust, no sag and no loosening, even with the coastal air.
- Safety: the family felt comfortable with tempered glass around young children.
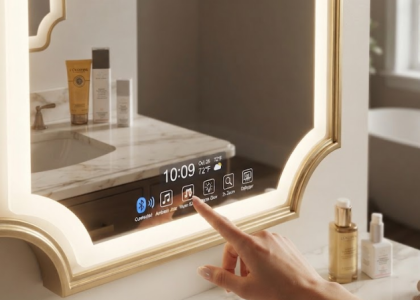
The client later asked for a quote on a
decorative LED smart mirror for the same bathroom, which is a common next step after a shower cabin upgrade. A single supplier handling both keeps the finish and the warranty process consistent.
Checklist for Your Own Apartment
- Ask for a site visit. Do not accept a quote based on your own measurements alone.
- Demand an itemised price. Glass, hardware, fabrication, delivery and installation as separate lines.
- Confirm glass type and thickness. Tempered, 8 mm to 12 mm, in writing.
- Specify stainless steel hardware. Especially for coastal areas like Clifton and DHA.
- Check building rules. Delivery hours, lift size and any permission required.
- Finalise measurements and holes early. Tempered glass cannot be altered later.
- Ask about warranty scope. Hardware and glass, and who handles claims.
- Plan for curing time. No showers for around 24 hours after installation.
- Ask for care instructions. Cleaning products to use and avoid.
- Confirm who installs. The supplier’s own team is better than a third party.
Red flags in a shower cabin quote
- No glass thickness mentioned. Thin glass is a safety and durability risk.
- No hardware specification. “Fittings included” is not a specification.
- No site visit offered. Expect fitting problems.
- Installation “by arrangement.” Responsibility gets blurred.
- Verbal warranty only. If it is not written, it does not exist.
- A price far below others. Find out what has been left out.
Frequently Asked Questions
1. How much does a shower cabin cost in Karachi?
Pricing depends on the design: standard cabins cost less, while custom frameless and sliding cabins cost more. Size, glass thickness, hardware and door type decide where your project lands. Send your measurements on WhatsApp for an exact written quote.
2. Do you install shower cabins in Karachi apartments?
Yes. We supply and install across Pakistan, including Karachi, Lahore, Islamabad and Rawalpindi, with on-site measurement before fabrication.
3. How long does the whole process take?
A typical job takes around two weeks from site visit to handover, with fabrication and toughening being the longest stage. Custom or oversized designs may take longer.
4. Is tempered glass safe for a family bathroom?
Yes. Tempered safety glass is much stronger than standard glass, and if it does break it crumbles into small blunt pieces rather than sharp shards.
5. Which glass thickness should I choose?
Our cabins use 8 mm to 12 mm tempered glass. 10 mm is a popular choice for frameless designs because it balances strength, weight and cost.
6. Will the hardware rust in a coastal area?
Stainless steel hinges and fittings are far more resistant to humidity and salt air than plated alternatives, which is why we recommend them for Karachi.
7. Can I install the cabin myself?
We do not recommend it. Frameless glass is heavy, cannot be trimmed on site and depends on exact levelling and fixings. Professional installation protects both your safety and your warranty.
8. What warranty do you offer?
We offer a 2-year warranty on glass panels and hardware, handed over at installation along with maintenance guidance.
9. How do I keep the glass clean?
Wipe with a soft cloth and non-abrasive glass cleaner after showers. Avoid harsh chemicals, and wipe limescale before it builds up.
10. Can I get a quote before committing?
Yes. Consultation is free, and you can start by sending your bathroom measurements and photographs on WhatsApp.
Turning a Case Study Into a Decision
The Clifton project worked because of decisions made before the glass was cut: a proper site visit, an itemised quote, a clear specification, stainless hardware chosen for the coastal climate and a team that handled delivery and installation as one job. None of those steps are expensive. They are the difference between a shower cabin that looks good on handover day and one that still performs years later.
If you are comparing suppliers, use the checklist above, ask each one for the same itemised breakdown and compare specifications before prices. If you would like to see how the numbers apply to your bathroom, our team can visit your apartment, measure the space and send a written quote.